|
|
Post by fivendime on Jul 25, 2010 10:17:18 GMT -8
I took the ring gear off and put a dial indicator to the mating surface of the ring gear on the ARB carrier. It checks out great and so does the body of the carrier. Since the ring gear was off I put it on the stock carrier and tossed it in to see what it would be like. No binding at all but I did have the backlash way out so it wasn't a great test. I think I will pull the bearing on the stock carrier and shim it over more to get correct backlash. I am also going to press on new bearings to the ARB carrier when I have time. My guess is the bearings are bad because the body of the ARB is fine. I am also going to try and find a flat glass surface to test the Ring gear for flatness.
|
|
|
|
Post by pistonschick on Jul 25, 2010 11:09:41 GMT -8
From Toyrocs (this was posted in the wrong area) What does the gear contact pattern look like on the drive & coast side of the teeth? Put marking compound at least every 120 Degree's. I usually check every 90 degree's. Put a load on the ring gear with your hand as you rotate the pinion by hand to check the gear contact pattern. Rotate the ring gear 720 degrees then check contact pattern. Has any experienced gear set up person been by to check what pattern you have? I took me over 5 times to get more proficient with gear set-ups/ readings. Back-lash settings? Usually about .008" to .010" is what I shoot for, as they always loosen up after some miles. FWIW: I have found that carrier setup bearings are great to get you in the ball park but ----- when you install the final shims and press on the running bearing the carrier setting DO CHANGE. Here is a question: Has this axle housing been bent or damaged? All sorts of strange stuff can happen if it is. Cap bolts torqued properly? Are all the bearing/ races & other mating surfaces clean? With all the work you have done taking this thing apart & back together again. Have you damaged some parts--- like damaged the outer races with a punch or some how distorted the roller cages-- for example? When you rotate the pinion gear ( without the carrier installed), are there any tight spots or areas with higher resistance as you rotate it 360 degree's? Are the pinion bearing outer races fully seated flush with the Housing? If they aren't, the pinion will be out of position for proper ring gear contact. Are the pinion & ring gears a matched set? They must have the same serial #. Usually a 4 digit # and are scribed/ etched onto each gear. I have found that the best MFG for gear sets are almost always the OEM. Cheaper aftermarket gear sets are just that-- cheaper in every way. If the OEM makes a gear set in your ratio use them (even if used). When you installed the carrier did you try to check the run-out of the ring gear mounting surface ( with the ring gear not installed)? You did say you checked the ring gear run-out( installed) of .002 to .003? The .003" sounds a little high. Remove the ring gear & recheck the mounting surfaces .Stone off or gentle file off any high spots. Recheck the carrier alone. Also remember that just because a part is new doesn't mean it's good! You could also check the ring gear for distortion by placing on a flat plate & using some feeler gages. A machine shop will have a good flat plate to measure for flatness-- you could try to use a plate glass( window?) as a shade tree mechanic flat plate.  Let us know what you find. Toyrocs |
|
|
|
Post by toyrocs on Jul 25, 2010 11:49:24 GMT -8
Another thing to look for is distorted carrier bearing shims. With the constant adjusting of the carrier, the shims can get smashed up sometimes. Also the gear backlash/ contact pattern can & will change while using set-up bearings. If the carrier has low pre load( with or without set-up bearings), the backlash/ contact pattern will vary & maybe even gear binding during rotation may be evident. The pre loads of the pinion & carrier must be correct before any reliable reading can be taken. Do you have the correct PNs for the carrier cone ( roller BRG) & the outer race? New? Used? Mixing up parts? There are also some different Dana 30s that take different parts! If I remember correctly the Dana repair manual calls for a special tool "housing spreader" to get the proper carrier pre load. The case spreader is about $250. I purchased mine from Rand's R&P. Great tool & worth the money. Beats shoving in a tight heavy carrier, on your back with your feet!  Toyrocs |
|
|
|
Post by fivendime on Jul 25, 2010 12:29:34 GMT -8
All the shims are in great shape and I'm keeping them clean. Bearings and races match and are in correct position. I have a case spreader that I am borrowing, and boy does it save time! I marked up about half the teeth in the area where it was hitting and found that it may just be that my pinion is a bit too deep right now. I seriously doubt that's the issue because I have had way less shim in there and it did the same thing. The Pinion is marking both sides of the tooth if I spin the carrier one direction.
|
|
|
|
Post by toyrocs on Jul 25, 2010 13:02:56 GMT -8
I'll asume you have the High pinion Gear set from a stock XJ dana 30 front end! (The last couple of years of the XJ they had low pinion gears).
Sorry, but just checking.
Cheers. Toyrocs
|
|
|
|
Post by fivendime on Jul 25, 2010 13:34:49 GMT -8
I'll asume you have the High pinion Gear set from a stock XJ dana 30 front end! (The last couple of years of the XJ they had low pinion gears). Sorry, but just checking. Cheers. Toyrocs Yeah, I have the high pinion stuff. I did another check. Seems like to me the pinion may still be too deep. When I turn the assembly the pinion is touching both sides of the ring gear teeth at the same time? I do believe this is not supposed to happen, and I think this is my problem. I am only left with the oil slinger now and no shims, but the pattern looks as if its still too deep IE flat on the bottom and crowned at the top like an umbrella. I'm about 2 shades from giving up on this mess. |
|
|
|
Post by fivendime on Jul 25, 2010 20:23:27 GMT -8
Riddle Me This. Check out how this pattern on my D30 looks. If you notice you can see that the contact pattern on the upper part of the picture is less then it is on the bottom by almost 1/4" in width. I dont know how the heck this could happen. I am leaning toward a bad ring gear cause everything else looks fine. Oh and its still binding up. This is where it was binding so I put the marking compound on it. HELP ;D 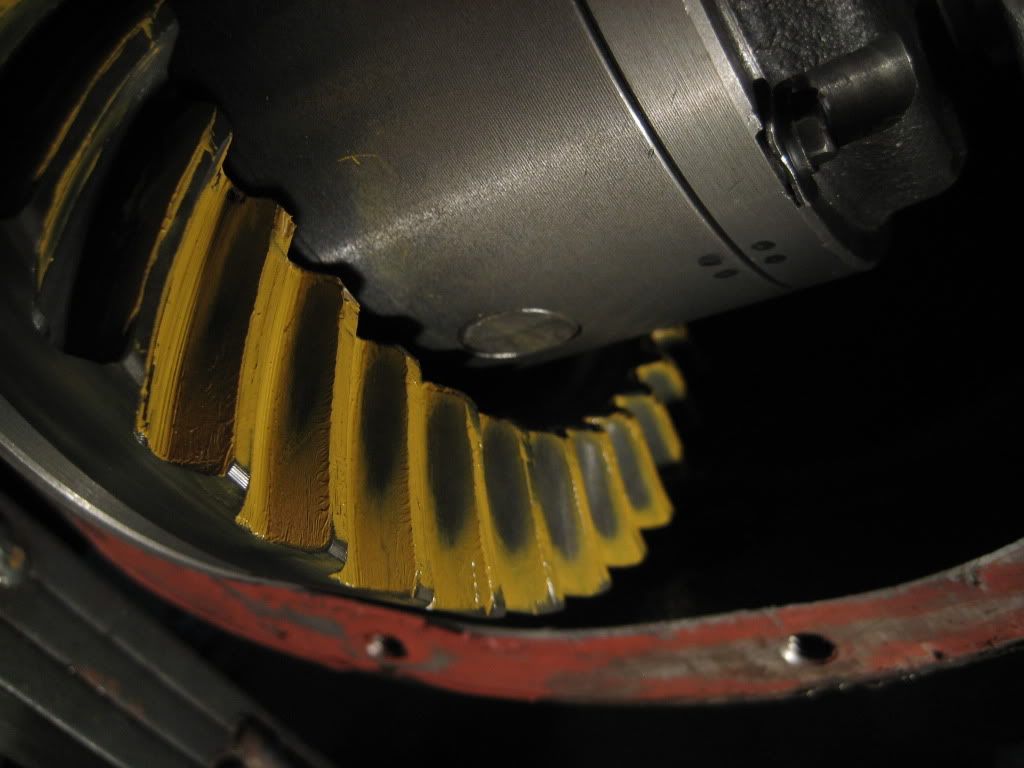 |
|
|
|
Post by fivendime on Jul 26, 2010 20:47:03 GMT -8
Well my suspicion is correct. I put a dial indicator on both the Heel and Toe of the ring gear teeth and found that they are WAY out. Must have been a bad set they sent me. Its out over .004" on quite a few teeth, and in 2 teeth it goes from .004" to .002" and a few teeth later it goes to .000" so I am going to give the supplier a call and have him exchange them for good ones. Pat also verified that is way to far out to be installing. No wonder its binding up, I cant get the correct backlash without it binding up.
Meanwhile I installed my new air line to the rear and hooked it all up. Switch and Solenoid work flawlessly! Click---Purge---Click---Purge---Oh how I love the ARB, cant wait to use it ;D
|
|
shortbus
Charter Member  Every great day ends in POO!
Posts: 254
|
Post by shortbus on Jul 27, 2010 16:56:40 GMT -8
I have a grinder that will fix that. LOL
|
|
|
|
Post by bigstuck on Jul 27, 2010 17:57:33 GMT -8
What brand gears did you buy Joey?
|
|
|
|
Post by fivendime on Jul 28, 2010 11:01:58 GMT -8
Grinder, shoot I wanted to take my 5lb sledge to it and wail away at it till I couldn't lift the hammer anymore LOL. I instead stared at it in disgust and said well, I guess it wasn't meant to be. I just got home now and am headed out to the shop to work on the gears since my new set was sitting on my doorstep. Wish me luck! The gears I had for the front came from Nitro Gears. I now have a set of what I think are Yukons for the fronts. Again...wish me more luck haha....praying always helps too  |
|
|
|
Post by fivendime on Jul 28, 2010 12:27:00 GMT -8
Superfantastic!
Set up the new gears and they work great with no binding!!!!!!!
I set pinion pre-load to 11inch lbs.
Set up the backlash at .007" and .009" so its right in the middle of where I need to be.
Now I must check for a pattern and see if my guess at the pinion depth was close or even right.
|
|
|
|
Post by fivendime on Jul 28, 2010 21:25:02 GMT -8
My superfantastic mood has been knocked down a few. After setting it all up it turns out the new bearings made the pinion a little to deep even after I took .001" out before I pressed the new ones on. I am going to take .004" more out because the pinion is WAY too deep. I cant believe how the new bearings did that. That and I toasted all 3 of my .003" shims when I pulled the bearing back off the pinion so I cant shim it to .003" or .002" without them. I realize that .004" is a big move but I think that's going to put me about where I need judging by how I shimmed the back axle setup. So tomorrow I will press the new bearing on and then put it all back together and check the pattern. Hope all goes well.
|
|
|
|
Post by pistonschick on Jul 29, 2010 2:49:44 GMT -8
Hey Joey,
Darel has a bunch of extra shim kits for Dana 30's - call me if you need them...
Crystal
|
|
tonka
Ok to Drive
 My Heep
Posts: 256
|
Post by tonka on Jul 29, 2010 16:52:51 GMT -8
well? I was sure you had it. whats up do you want to bring it down?
|
|